Showing posts with label mini quilt. Show all posts

Nov 16, 2015

Cozy Season Mini


I think this is such a cute little mini quilt!
Lori Holt designed it and you can find the tutorial here.
This is the one I made, it's for a special friend for Christmas :)
Shhhhh......don't tell her!


I love this calendar, it's full of beautiful photos of Lori's quilts.
There is also the pattern for the quilt on the cover, and of course the cozy cottage too.
My dear friend sent it to me, she is very thoughtful :)


Three little posies, all in a row...
There is happiness in choosing scrappy :)


All the fabrics in this cozy cottage (except for the background) are Lori's because I know my friend loves Lori's creations as much as I do!


Eight flying geese high up in the sky, in my favorite aqua colors.


When choosing scrappy, I try to vary the colors and choose contrasting prints.
They have a fall theme, but the tree could also represent all the seasons.


Quilting minis is very liberating, they're so easy to work with.
I always love the look of matchstick quilting, straight lines different widths apart.


I backed the mini in "Sew Cherry", one of my favorite fabric lines of all time!


I can hardly wait to see my friend's reaction when she finds out this is for her :)
Don't tell her!!!


post signature


Sep 21, 2015

Embroidered Mini Quilt


I love embroidery, and was asked to do a swap with a friend on Instagram.
Her name is Leanne and she lives in Tasmania, Australia.
This is her blog, Lizzie the quilter., she blogged about the mini quilt I made for her.
The embroidery is by Sarah Jane, I bought the pattern and used my own colors.
I embroidered in the car on one of our road trips :)
I chose a white printed quilt cotton to use as a base for the embroidery.


I have a thing for detail, I love it!
I have a box of little l l/2" squares that I've been collecting from my scraps.
I used the prettiest, brightest, happiest colors I could find.
I love pinwheels too, so I used a lot of those.


More little squares in deliciously cheerful colors and prints!


Excuse my stained ironing board cover, it's from the spray starch (Mary Ellen's starch press) that I use on my blocks.
Cute little pinwheels, I love them!


I enjoy designing quilts, I always feel a great sense of satisfaction and accomplishment.
This little quilt measures approximately 16" X 24".
It's so feminine, and I had a really difficult time giving it away :)


I contemplated long and hard, about what color to use for the binding.
I always like the binding to pop, and with so many pretty colors, I thought that black would do the job.
I really like the effect.


I used a jigsaw quilt pattern for the machine quilting, and tried to make it as small as I could, to match the teeny measurements of the quilt.
I used a yellow Tanya Whelan print for the back.


I wanted the little embroidered girl to stand out, so I machine stitched pebble quilting around her.
She is smelling a bouquet of flowers, and Leanne loves flowers!
Check out her blog, she has a genuine green thumb :)
I hope you like the mini quilt I designed as much as I do.

post signature

Dec 15, 2014

Doll Bedding


My son is making my little 4 year old grand daughter, a bunk bed for her dolls.
I am making the bedding :)
Isn't this the cutest photo of my Red Rose reading a book? Lol!


Little Boo is listening to the story too.
(This is the other side of the above quilt)


Red Rose is an 18" doll and she fits the mattress perfectly.


I made 2 pillows and 2 mattresses, they're both reversible.


I made 2 quilts, and this is a photo of both of them, front and back.


I had so much fun making these gifts!!!

post signature

Jul 20, 2012

Binding Tutorial, Part 2

I hope you read my binding tutorial, part 1.  It can be found here.
After I have attached the binding to the front of the quilt, I hand sew it on the back.
There are a few tools of the trade that I always use for this.
Scissors, quilting thread, needle and pins.


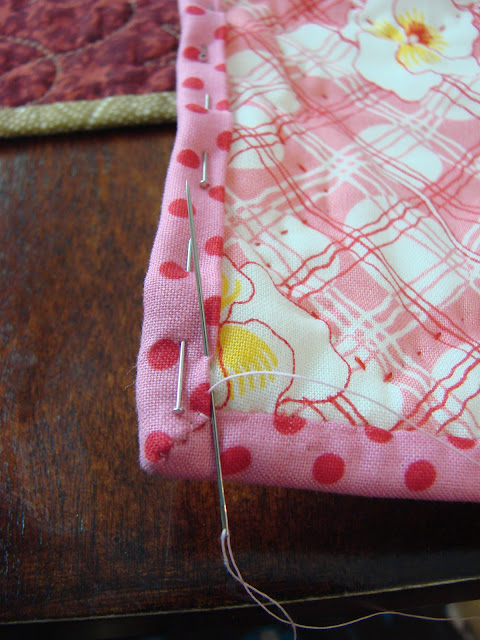
I pin the binding on the back, so that the binding hugs the quilt, and the machine stitching is hidden.


I thread my needle with a single thread and knot the end. Then I use a blind stitch. Take a small bite out of the fabric on top (binding).....


.......and take a few fabric threads from the quilt (pink fabric), directly below where you took a stitch in the binding.  Then take another stitch in the binding, about a centimeter or 1/4" away from your previous stitch.  


Now we're coming close to the corner.


Pin around the corner, the miter takes its shape naturally because of the method it was sewn in part 1.  Help it along by pinning.


I take little stitches along the miter seam in the corner, going down and then coming back up again.


Continue on your merry little way, stitching until you're finished.


Now turn the quilt over and admire your handiwork.


This is my favorite method of attaching binding.  The corners look perfect every time.


Pretty on the back too.


I hope you have enjoyed the tutorial, and even found it helpful.


I always look forward to binding my quilts.  I can grab my tools, stretch out my legs and hand sew while I watch or listen to the TV. 


My little quilt is colorful, do you think it looks good on the chair?


My cute little "grandmother" looks nice on the mini quilt. My mother sculpted her.  She has a faraway, pensive look in her eyes.  She has lived a rich life and when she sits down to sew all of the many warm memories of children and grandchildren and friends flow through her mind as she thinks and quilts.
She looks kind of sad though, maybe all she has left to keep her company are her memories and her quilts.....


post signature

Jul 18, 2012

Binding Tutorial, Part 1

I like to cut my binding strips 2" wide for double-fold binding.
I like this size because finished double-fold binding sews on smoothly with a l/4" seam allowance, hugs the edge of the quilt, makes a neat miter fold, and covers all stitching when it is turned over the edge of the quilt. 
Many quilt patterns call for a 2 l/2" wide binding, but my preference is 2". DON'T cut your binding on the bias unless it will be going around a curve.

If you have a smartphone, Robert Kaufman has a great app for calculating the yardage needed for the binding on your quilt. 
It is better known as The Quilters Little Helper.
All you do is add the dimensions of your quilt and the width of your binding and the app will calculate exactly how much yardage you need for your binding.  It provides lots of other calculations as well!

Here is my mini granny mini quilt. I posted about his quilt here.


Since the mini quilt is so small, it wasn't a bother to hand quilt around the mini granny squares.  I have always loved this look and decided to use embroidery thread that matched the color of each square.  I used DMC floche.  The cotton thread has a lovely, silky feel to it.  I always use this thread when I smock.  
I thought about machine quilting inside each square, but the blocks are so little they don't really need it.  It might also detract from the hand quilting.


Cut off the excess batting and backing, flush with the quilt front.


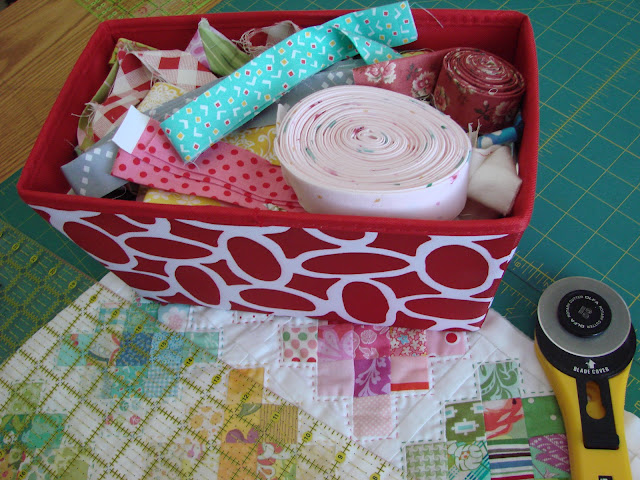
Whenever I attach binding to my quilt, there is always some leftover.  When I was making my Swoon quilt, I pre sewed the binding.  When the quilt was quilted and ready to be bound, I changed my mind and used another fabric for the binding.  I save all my bits of binding, some longer than others.  I'm just going to pick some bright colors out of my binding basket and sew a scrappy binding.


I think these ones will look fabulous!


Now I need to join my binding pieces together.  I would do this even if I were using 45" long strips of the same color.  
Place two strips right sides together, crossing the ends at right angles, leaving a l/4" overlap on two sides.


Sew a straight line from point to point.


Trim the seam to l/4".


Press the seam open.


Now fold your binding in half, wrong sides together.


I sewed all my binding strips together, pressed the seams open and folded them in half and pressed again.


Avoid starting to sew the binding exactly in the middle of a quilt edge.  Each time you fold your quilt in half, it will weaken at that spot.  This is a mini quilt (15" X 15") so that rule doesn't apply.

Don't pin the binding to the entire quilt before sewing.  As you sew, the binding may "bubble up" between the pins and cause little tucks. 

As you sew, concentrate on the 3" of binding directly in front of the sewing machine needle.  Lay the first 3" in position and sew, then go on to the next 3".  Before long, these 3" lengths will add up to the entire quilt!

Place one end of the binding 6" from one of the corners.  Align the cut edges of the binding strip with the cut edges of the quilt.  Start sewing 4" from the beginning of the binding. 


 Use a l/4" seam allowance, there is no need to backstitch when you begin to attach the binding.


A straight pin will help you mark the place l/4" away from the edge, to stop stitching.  


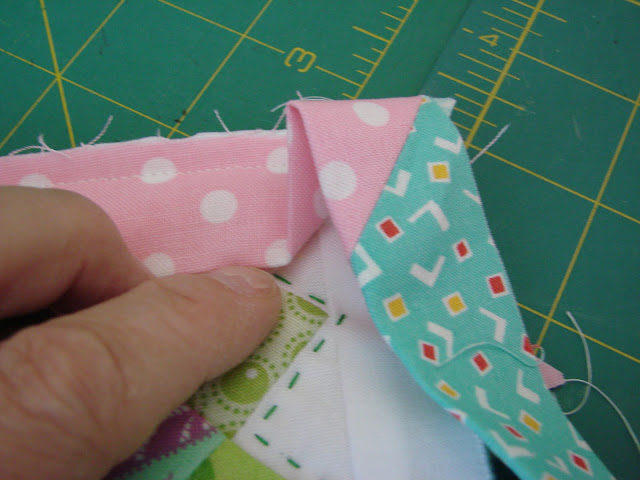
Fold the binding so that it extends straight up from the second edge of the quilt.  You'll be creating a diagonal fold, which will create the miter. 


Fold the binding down, aligning it with the second edge of the quilt. The fold should be even with the first edge of the quilt.  


Sew the binding to the quilt from the top, using a l/4" seam allowance.


Repeat these steps for the remaining corners on your quilt.


Stop sewing the binding approximately 6" away from the starting point.  


Cut the end of your binding with a perpendicular cut so that it overlaps the beginning end of your binding.  The length of the overlap must equal the width of your binding strip.  I use a 2" overlap for 2" wide binding.  You would have a 2 l/2" overlap for 2 l/2" binding, etc.  


There is a 2" overlap, because my binding is 2" wide.


Open the folds of the two strips and overlap them at right angles with right sides together as shown.  Pin them together.  Draw a diagonal line between the two points where the binding strips intersect as shown. (I've done this so many times that I don't draw the line anymore)


Here is a diagram that might better illustrate the directions.  


Sew the ends together on the marked line (from point to point).


Trim the seam to l/4".


Press the seam open.


Refold the seamed section of the strip, return it to the edge of the quilt.


Finish sewing the binding in place, it is a perfect fit!


Trim all the threads from your corners and the little triangle bits.


Congratulations, you are now ready to sew the binding onto the back of the quilt.


I will share that with you in Part 2, Friday's post.


post signature